


Product care.
Learn the basics, how to maintain your instrument, and much more here.
First, take note of the two leather ends on the guitar shoulder strap. Notice that the two ends each have a hole punched into them. Using the holes, these ends are attached to the strap buttons located on the body of the guitars. Once the shoulder strap is connected to the guitar, the main portion of the shoulder strap rests on your shoulder.
Let’s move on to adjusting the shoulder strap. Once the shoulder strap is connected to the guitar, you can adjust the length of the shoulder strap by pulling on the woven material. Of course, be careful not to pull on the strap too hard. After you find your desired length, you’ll need to secure the strap, so your adjusted length stays set. To do this, take the leather end that is attached to the top of the guitar body and thread it through the buckle on the other leather end. Once it is threaded, pull the leather end to ensure the fit is snug and comfortable. Finally, repeat this process with the leather end on the bottom of the guitar body and you’re done.
Last note, always check your strap to make sure it is securely attached to the guitar before you start to play.
There is no set amount of time when you should change your guitar strings. When you notice that your guitar strings are worn, flattened, corroded, or rusted, then that is the time to change your guitar strings. If your guitar strings have a buildup of grease, sweat, or grime around them or your guitar does not produce the sound you believe it should be producing, then that is another sign that it is time to change your guitar strings.
To change your guitar strings, you will need a new set of strings, a string winder, and wire cutters. First, lay your guitar down in a soft, open space where it won’t be scratched. Next, loosen the tension of each string. Then, use your wire cutters to the strings close to the tuning pegs. After that, remove the strings from the bridge. Once all the strings are removed, clean the fretboard and body of the guitar. Now to place in the new set of strings, start by threading the new string through the bridge and up to the corresponding tuning peg. Leave enough slack so the string can wrap around the peg a few times. Next, tighten the string by turning the tuning peg clockwise with your string winder. Continue to repeat this process for each string. Make sure to stretch each string as you tune to ensure it will hold its tune properly. Once your strings are tuned, use your wire cutters to trim the excess string from each tuning peg. Finally, look over the guitar. Once everything is properly in place and your strings are well-tuned, you are set to start playing again.
Over time, oil, dirt, and grime will build up in the strings, fretboard, and body of the guitar as you play. This is unavoidable and normal. However, proper care and maintenance of your guitar can help keep your beautiful instrument in tip-top condition so you can continue to jam out for years to come.
First, let’s talk about cleaning the guitar. Cleaning the guitar will help keep it looking good and prolong its lifespan. To clean the guitar, you will need a soft, lint-free cloth, like a microfiber cloth. Wipe down the body of the guitar, making sure to wipe in all the nooks and crannies. Next, spray a small amount of guitar cleaner into the cloth. Don’t spray the cleaner directly on the guitar. Use the cloth to clean the strings, fretboard, and any metal parts on the guitar. Once the cleaning process is done, use a separate polishing cloth to wipe down the guitar again buffing the finish.
Now, let’s talk about guitar maintenance. There are many things that go into maintaining a guitar, two of the most important aspects are tuning and humidity control. One, always make sure to keep the guitar in tune. To tune your guitar, use a guitar tuner to make sure the strings are always in the correct pitch. Two, keep the guitar at the correct humidity level. A guitar humidifier can help prevent the wood of the guitar from drying out and cracking.
Follow these beneficial tips and you will have a well-maintained guitar for years to come.
First, let’s go over what barre chords are. A barre chord, also known as a bar chord, is a type of chord on a guitar played by using one finger to press down multiple strings across a single fret. The finger commonly used to create a barre chord is the index finger.
To start, place your index finger on the desired fret and press down firmly on all the strings in that fret. Make sure you are pressing down on the strings and not the fret wire. Next, use your other fingers to form the chord shape. Doing this action will take practice so it is best to start with basic chords and work your way up. When performing the barre chord make sure to apply enough pressure to create a clear sound. However, don’t press down too hard because too much pressure can cause discomfort to your fingers. Continue to practice this technique over and over again because doing a barre chord effortlessly takes time to master.
To start, make sure the guitar is tuned properly. You can use a tuner or a smartphone app to tune your guitar. Once your guitar is tuned, you can begin playing solos. Start by playing a pentatonic scale which is a five-note scale. The pentatonic scale is a great starting point because it sounds great and is easy to remember. Start by playing the first note of the scale on the fifth fret of the low E string.
Then, play the next note on the eighth fret of the low E string. Continue playing the scale, moving up one fret at a time until you reach the fifth fret of the high E string.Now that you know how to play the pentatonic scale, you can add more to your play. The first thing you can do to shake things up is add bends to the notes. To add a bend, start by playing a note and then bend the string upwards until the pitch changes. Another technique to add to your play is vibrato. Vibrato is a technique where you rapidly oscillate the pitch of a note. This can be done by wiggling your finger on the string while holding down the note.
Now that you understand the pentatonic scale, bends, and vibrato, you are ready to start playing some solos. Remember you’ll never grow if you don’t experiment and try new things. Be patient, practice, and don’t be afraid to add your own style to your guitar solos.
To start, make sure the guitar is tuned properly. You can use a tuner or a smartphone app to tune your guitar. Once your guitar is tuned, you can begin playing open chords.
To play open chords, you will need to place your fingers on specific locations on the fretboard. Let’s start with the C chord. Place your third finger on the third fret of the fifth string, your second finger on the second fret of the fourth string, and your first finger on the first fret of the second string. Then, strum all of the strings starting from the fifth string. Next is the G chord. Place your third finger on the third fret of the sixth string, your second finger on the second fret of the fifth string, and your fourth finger on the third fret of the first string. Strum all of the strings starting from the sixth string. Next up is the D chord. Place your first finger on the second fret of the third string, your third finger on the third fret of the second string, and your second finger on the second fret of the first string. Once again, strum all of the strings, but this time start from the fourth string. Finally, there is the E minor chord. Place your second finger on the second fret of the fifth string and your third finger on the second fret of the fourth string. Then, strum all of the strings starting from the sixth string.
Now that you can play these four chords, you can start learning songs and experiment with different chord progressions
Learning to read chords is an essential skill for any guitarist. In order to read chords, let’s start by understanding what a chord chart is. A chord chart is a diagram that shows you where to place your fingers on the fretboard to play a specific chord.
Different chord charts can have different chords within the chart. However, the layout for each chord is always the same. The black dots represent where you should place your fingers. Let’s use the G chord as an example. To play the G chord, place your second finger on the third fret of the low E string, your third finger on the third fret of the high E string, and your fourth finger on the third fret of the B string. Next, find the C chord on a chord chart. To play the C chord, place your first finger on the first fret of the B string, your second finger on the second fret of the D string, and your third finger on the third fret of the A string. To play the A chord, Place your second finger on the second fret of the D string, your third finger on the second fret of the G string, and your fourth finger on the second fret of the B string. Of course, there are other chords you can try and play as well. Look up different chord charts to find other chords to try.
Now that you know how to read and play chords, practice transitioning from one chord to another. To strum the guitar, hold the pick with your thumb and first finger and move it across the strings.
The first step into properly storing a LyxPro guitar is to invest in a guitar case. A guitar case is great for protecting, storing, and transporting your guitar from one place to another. A hardshell guitar case is one of the best choices for a case because its sturdy, durable construction provides the most protection for your guitar. It is also important to make sure you get the right-sized case for your guitar. Your guitar should fit snugly into the case so there is no space for your guitar to slide or bump around in the case.
Once you have the right case, loosen the strings on the guitar before you store the guitar in the case. Place the guitar in the case then close up the case. Make sure the case is sealed by securing any latches or locks. If your case has a built-in humidifier, make sure it’s filled with water to maintain the proper level of humidity inside the case.
All that is left now is to find a safe location to store your guitar case. Keep it away from extreme temperatures and humidity, as well as any potential hazards like pets or children. A closet or a spare room is a good choice, as long as it’s in a dry and secure location. By following these steps, you can ensure your guitar will stay in a good condition when stored away.
Let’s go over the basics of strumming a guitar. First off, make sure you are in a comfortable position. Discomfort may lead to a bad performance or a short play session. Get comfortable as you hold up your guitar. Rest the body of the guitar on your thigh and make sure the neck of the guitar is pointing upwards at a slight angle. Hold the guitar pick between your thumb and index finger. Make sure the point of the pick is facing toward the strings. Raise your strumming hand, which is the hand holding the pick, and bring it down toward the bridge. Start lightly strumming the strings with the pick in a downstroke motion. Keep your wrist loose and relaxed as you practice different strumming patterns such as down-up, down-down-up, or down-up-down-up. Continue to strum light to produce soft sounds and strum harder to produce louder sounds.
If you’re having trouble keeping a steady rhythm, you can practice with a metronome. Set the metronome to a comfortable tempo and practice strumming along with it. This will help you develop your timing and make your strumming sound more polished.
And just like that, you are one step closer to becoming an expert guitarist. Continue to practice regularly and don’t be afraid to mix in different strumming patterns.
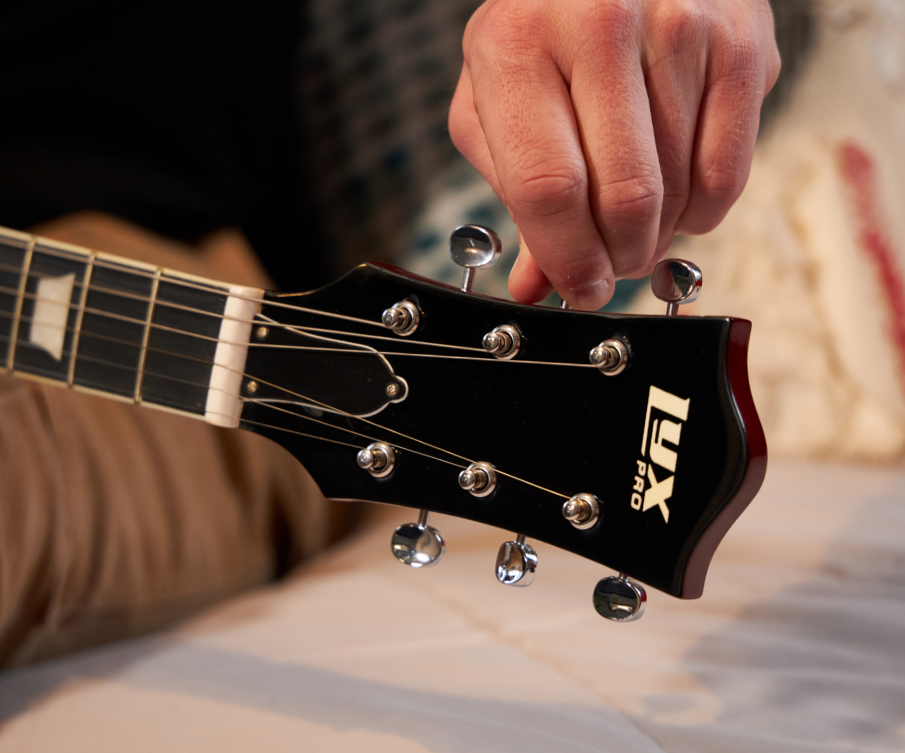
It is important to make sure your guitar is properly tuned. Tuning your guitar is essential in making sure it produces a great, clear sound. There are different tools out there that can help you tune your guitar. The tuner that we will go over is the LyxPro clip-on digital tuner. This tuner is a small, compact device that clips onto the headstock of your guitar. It comes with an easy-to-read LCD display that shows you the note you’re playing and whether it’s in tune or not.
To start tuning your guitar, you’ll need to turn on the tuner by pressing the power button. Then, clip the tuner onto the headstock of your guitar, making sure it’s securely attached. Next, pluck the thickest string on your guitar, which is the low E string. The tuner should detect the pitch of the string and display it on the screen. The display will show you whether the string is in tune or not. If it’s not in tune, the display will indicate which direction you need to turn the tuning peg to bring it into tune. Keep plucking the string and adjusting the tuning peg until the display shows that the string is in tune. Once the string is in tune, continue this process for all the other strings starting with the A string, then the D string, G string, B string, and finally the high E string.
Remember, always tune up to the desired pitch, not down. This will help ensure that your guitar stays in tune and doesn’t put too much tension on the strings. Once you’ve tuned all of the strings, give them a quick strum to make sure everything sounds in tune and adjust any strings if needed. And just like that, you have successfully tuned your guitar.
LyxPro has three types of guitars in its collection: the SB series, the TL series, and the CS series. These three guitars each have their own sound, design, and benefits that come with them. It is important to understand the difference between them, so you are able to choose the right guitar for your musical journey.
SB series
The SB series is a guitar that embraces classic craftsmanship while adding just a few modern additions to the instrument. This electric guitar features two humbucker pickups, a 3-way pickup selector, and a single-cutaway body made of mahogany wood. The fully-loaded SB series guitar is a beautifully built instrument with a set-in neck for added strength, sealed tuners that prevent dust buildup, and four volume/tone knobs for sound adjustment. This professional-quality electric guitar is perfectly designed to produce warm, thick sounds. It is an ideal choice for music genres like jazz, blues, metal, and rock.
TL series
The TL series is an electric guitar designed with versatility and sustainability in mind. This electric guitar features two single-coil pickups, a vintage ashtray bridge, and a single-cutaway body made of paulownia wood. The gorgeous TL series guitar is a beautifully built instrument with a C-shaped neck for added comfort, sealed tuners that prevent dust buildup, and two volume/tone knobs for sound adjustment. This authentic electric guitar is perfectly designed to produce mellow, twangy sounds. It is an ideal choice for music genres like rock, pop, blues, and country.\
CS series
The CS series is a lightweight electric guitar made to make you feel like a true rockstar. With the most amount of sizes in the collection, the CS series is a perfect starter guitar for all ages. This electric guitar features three single-coil pickups, a 5-way pickup switch, and a double-cutaway body made of paulownia wood. The striking CS series guitar is an extraordinary instrument with a beautiful rosewood fingerboard, a tremolo arm hole for unique effects, and three volume/tone knobs for sound adjustment. This reliable electric guitar is perfectly designed to produce sharp, crisp sounds. It is an ideal choice for music genres like blues, rock, reggae, and funk.
A capo is a clamp used to press down on all strings in a fret on a musical instrument. A capo or a guitar clamp makes the area where you can play shorter and raises the pitch of the guitar. A capo is a great device for playing different keys without having to learn new chord shapes. To use a capo, place it on the neck of the guitar. Make sure it is placed close to the desired fret, but not on top of it. Next, clamp the capo onto the neck of the guitar. Make sure it’s tight enough so that all the strings are pressed down firmly against the frets, but not so tight that the strings are out of tune. Once the capo is in place, you can start playing chords in a different key. For example, if you place the capo on the second fret, all of the chords you play will be in the key of D instead of the key of C. The capo can also be moved to different frets in order to change keys. Practice using the capo and experiment with different positions to get the sound you are looking for. When you’re done playing, carefully remove the capo to slowly release the tension on the strings.
A LyxPro guitar is a fantastic instrument for all ages that has amazing sound quality. One of the reasons why the sound is great on the LyxPro electric guitar is that the guitar comes with a pickup selector switch that allows you to achieve your desired tone and sound. Whether it is a SB series, a TL series, or a CS series, each guitar has a pickup selector that allows you to change up the sound at any time.
Let’s talk about the pickups on a guitar. Every LyxPro guitar comes with at least two pickups: a neck pickup and a bridge pickup. The neck pickup is located near the neck of the guitar, while the bridge pickup is located near the bridge. Each pickup is designed to capture the sound of the strings differently, which can help you achieve different tones.
To adjust the pickup settings on your LyxPro guitar, you’ll need to use the pickup selector switch located on the body of the guitar. Keep in mind that some guitars have different style pickup selector switches than others. The SB series and TL series guitars use a 3-way pickup selector switch while the SB series guitars use a 5-way pickup selector switch. By default, the switch is in the middle position, which activates both pickups. To select the neck pickup, move the switch toward the neck of the guitar. To select the bridge pickup, move the switch toward the bridge of the guitar. The SB series and TL series allow you to change between the neck, middle, and bridge pickup positions. For the SB series, you can change between the neck, neck and middle, middle, bridge and middle, and bridge pickup positions.
Now let’s go over the difference in tones for each pickup. The neck pickup is great for achieving warm, mellow tones, while the bridge pickup is great for achieving brighter, sharper tones. By selecting one or the other, or using a combination of both, you can create a variety of different sounds. Finally, keep in mind that the pickup settings can also affect the volume of your guitar. When the bridge pickup is selected, the guitar will typically sound louder than when the neck pickup is selected. This is because the bridge pickup captures more of the string’s vibrations, which creates a more powerful sound.
Remember to experiment with different settings to find the perfect tone for your music.

Join the Lyx community.
Join the LyxPro Community and learn how you can
get discounts and special offers. Stay informed
on everything Lyx.